Github 的使用笔记
# Github 的使用笔记
[TOC]
# 注册登录github
# 创建一个新的仓库
# 在Github上点击“New repository”创建一个新的仓库
| 仓库名称,与后期的仓库地址有关 | 仓库描述 |
|---|---|
 |  |
- ------Description:添加仓库说明,不是必填项
- ------Public、Private:选择公开还是非公开仓库,但是非公开仓库目前是收费的
- ------Initialize this repository with a README:如果选中此项,随后Github会自动初始化仓库并设置README文件,让用户可以立即clone此仓库。如果想向Github添加手中已有的Git仓库,建议不要勾选,直接手动push
- ------Add.gitignore:初始化自动生成.gitignore文件(该文件用来描述Git仓库中不需要管理的文件与目录)省去了每次根据框架进行设置的麻烦
- ------Add a license:选择要添加的许可协议文件。
这样我们就得到了仓库的http以及ssh的地址:

# …or create a new repository on the command line
echo "# GithubUserbook" >> README.md
git init
git add README.md
git commit -m "first commit"
git remote add origin https://github.com/weihuohuayi/GithubUserbook.git
git push -u origin master
2
3
4
5
6
# …or push an existing repository from the command line
git remote add origin https://github.com/weihuohuayi/GithubUserbook.git
git push -u origin master
2
# …or import code from another repository
You can initialize this repository with code from a Subversion, Mercurial, or TFS project.
# 下载Git
点击https://git-for-windows.github.io/进入Windows版本的Git下载,安装
# git配置
# 生成公钥和私钥
在本地创建ssh key 优点:git push推送仓库时候,不需要输入用户名密码
设置SSH_Key
右键 → git-bash
$ ssh-keygen -t rsa -C "youremail@example.com"
# 使用自己注册时候的邮箱
2
| 操作系统 | Linux | Windows |
|---|---|---|
| 文件位置 |  | |
| 查看秘钥 | cat ~/.ssh/id_rsa.pub | 打开id_rsa.pub 获得自己的密匙 |
# Github添加公开秘钥:
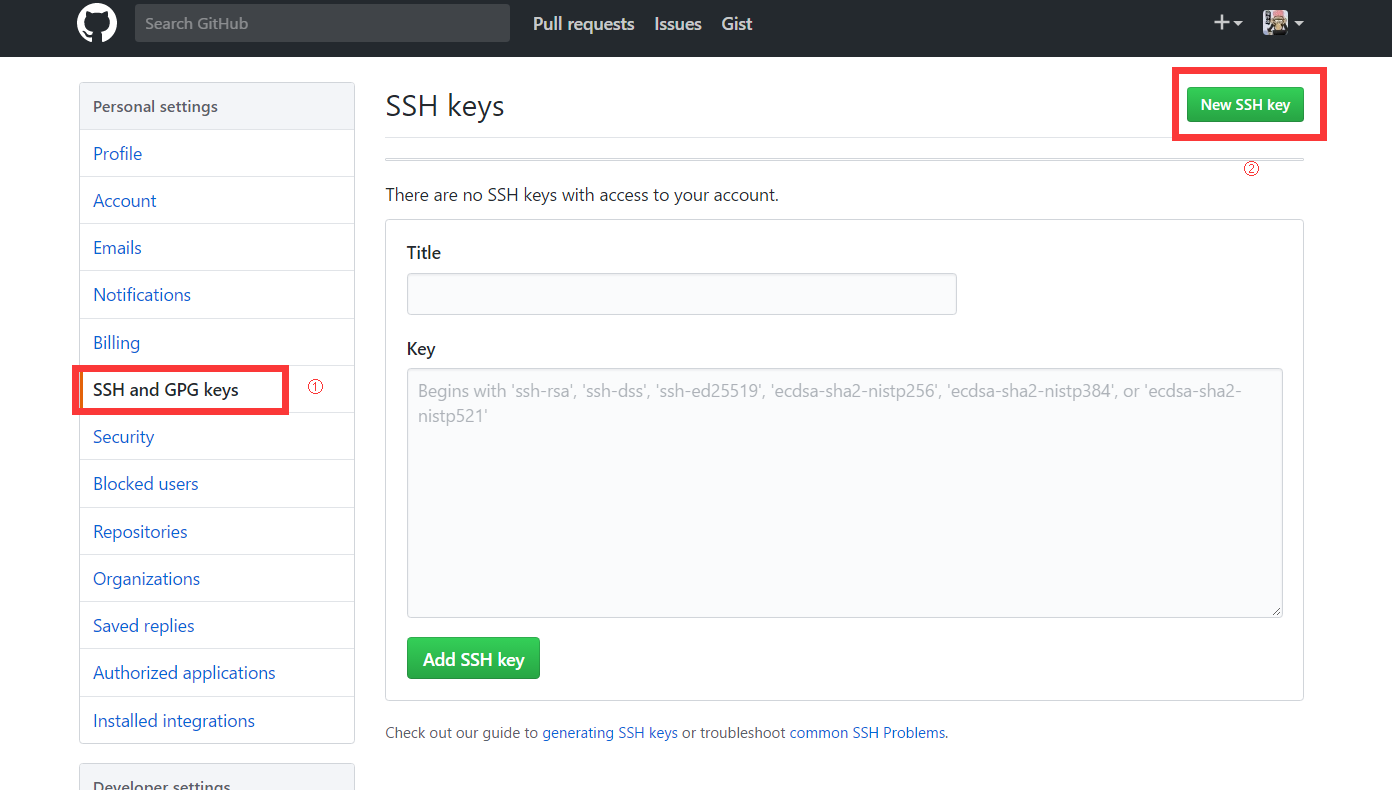
打开github,找到setting,进入 Account Settings(账户配置),左边选择SSH and GPG Keys选项:

title随便起个名字即可,key是上一步中的id_rsa.pub的内容
成功后出现指纹 Fingerprint

为什么GitHub需要SSH Key呢?
因为GitHub需要识别出你推送的提交确实是你推送的,而不是别人冒充的,而Git支持SSH协议,所以,GitHub只要知道了你的公钥,就可以确认只有你自己才能推送。
当然,GitHub允许你添加多个Key
假定你有若干电脑,你一会儿在公司提交,一会儿在家里提交,只要把每台电脑的Key都添加到GitHub,就可以在每台电脑上往GitHub推送了。
# 本地验证是否绑定本地成功
在git-bash中验证,输入指令:
$ ssh -T git@github.com1如果第一次执行该指令,则会提示是否continue继续,如果我们输入yes就会看到成功信息:
# 配置gitbash本地客户端
- 设置姓名和邮箱地址
- 由于GitHub每次执行commit操作时,都会记录username和email,所以要设置它们:
# 配置一个用于提交代码的用户
$ git config --global user.name 'yourname'
# 配置一个用户邮箱
$ git config --global user.email 'youremail@youremail.com'
2
3
4
- 提高,命令输出的可读性
git config --global color.ui auto
# 连接远程仓库
# 识别Github仓库的项目的路径

# 创建本地仓库并上传github
- 我们需要将本地仓库上传至GitHub
- 建立本地仓库
- 创建了一个名为“img”的文件夹
- 其下创建一些文件
- 文件夹内右键 → git-bash
在本地创建一个文件
- echo : 输出文字到控制台
- echo "# GithubUserbook": 输出文字标题‘GithubUserbook’到控制台,并赋值到README文件
初始化本地仓库
git init
得到一个隐藏的.git文件夹,该文件夹是Git用来跟踪管理版本库的
添加README文件到本地仓库
- git add README.md
添加这一步的注释
- git commit -m "first commit"
git add 将文件假如暂存区,在通过git commit 命令提交,添加成功后,可以通过git log命令查看提交日志
远程库的地址

- https://github.com/weihuohuayi/GithubUserbook.git
推送
git push -u origin master
echo "# GithubUserbook" >> README.md
git init     //把这个目录变成Git可以管理的仓库
git add README.md      //文件添加到仓库
git commit -m "first commit"//-m参数后的"First commit"称作提交信息,是对此次提交的描述
git status //查看提交后的状态,一般可跳过
git remote add origin https://github.com/weihuohuayi/GithubUserbook.git
git push -u origin master   //把本地库的所有内容推送到远程库上
1
2
3
4
5
6
7

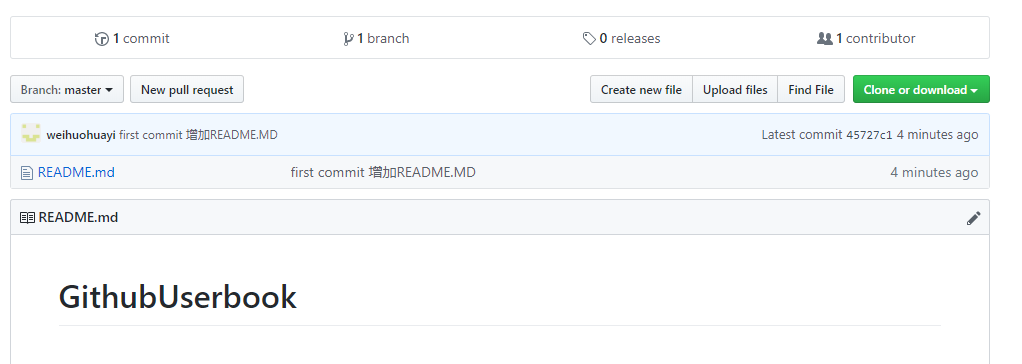
推送成功 !
将所有文件添加到仓库,并推送到Github
git add .
git commit -m "初次添加本文件夹所有文件到本地仓库"
1
2完成本地仓库的文件添加,初步建全文件
本地仓库关联GitHub的仓库
git remote add origin https://github.com/weihuohuayi/GithubUserbook.git1提交文件,同步仓库
git push -u origin master1将本地的
master分支推送到origin主机,-u 表示指定了origin为默认主机。git push origin master1完成了默认主机指定后,就可以单纯使用
git push推送了。
# 在服务器(阿里云)新建目录,获取github仓库的项目代码
git clone git@github.com:weihuohuayi/gitbook.git
# 文件的维护
# 文件的修改与提交
当完成所有文件的初始提交后,下一步我们会对文件内容进行修改更新。于是需要将本地更新文件进行远程同步。
- 文件修改
- 打开文档,添加信息,保存退出
- 查看本地库中文件的状态
- git status 告诉你有哪个文件被修改过
- git diff 可以查看修改内容
- 提交修改
- git add
- git commit -m ''
- 查看提交日志
- git log
# 克隆远程库
git clone git@github.com:weihuohuayi/gitbook.git
# git的文件递交pipeline
1. git init //初始化仓库
2. git remote add origin + 远程仓库地址 //链接远程仓库,创建主分支
3. git pull origin master // 把本地仓库的变化连接到远程仓库主分支
4. 添加或修改文件
5. git add .(文件name) //添加文件到本地仓库
6. git push -u origin master //把本地仓库的文件推送到远程仓库
2
3
4
5
6
# 分支管理
https://www.liaoxuefeng.com/wiki/896043488029600/896954848507552


